SpineML The Spiking Neural Mark-up Language
Building on Windows
SpineCreator is built using the Qt toolkit (https://www.qt.io), a cross-platform library of C++ code for building desktop apps. This means that SpineCreator can be compiled on Windows just as well as on Mac or Linux. Previously, we only supported Mac and Linux as “first class citizens”, due to a lack of developer resource. SpineML_2_BRAHMS in particular would have required a great deal of work to function on Windows, as it includes bash scripts.
Luckily, Microsoft have recently added bash for Windows
- Now that it’s possible to install bash on Windows 10, it’s possible to build and run SpineCreator and SpineML_2_BRAHMS on Windows. Here is a work in progress to describe how to build SpineCreator, SpineML_PreFlight and SpineML_2_BRAHMS on Windows 10, providing a fully-functional SpineML toolchain to develop and execute neural network models.
Prerequisites
Install Windows Subsystem for Linux
A new feature in Windows 10 is the ability to install a Linux distribution to provide the bash shell and other Unixey utility programs, such as ssh, git and so on. So, the first task is to install it. Here are Microsoft’s own instructions:
https://docs.microsoft.com/en-us/windows/wsl/install-win10
During this process, choose Ubuntu in the store (other Linux flavours may well work, but I’ve tested Ubuntu).
Once you have Ubuntu installed (you should be able to run bash.exe), you can install some pre-requisites:
sudo apt install build-essential cmake zlib1g-dev libpopt-dev xsltproc
build-essential installs compilers, cmake is a development tool for directed compilation, zlib1g-dev is a library used by BRAHMS, SpineML_PreFlight uses libpopt-dev and xsltproc is a program for parsing XML files and is used by SpineML_2_BRAHMS.
Install the Qt build environment
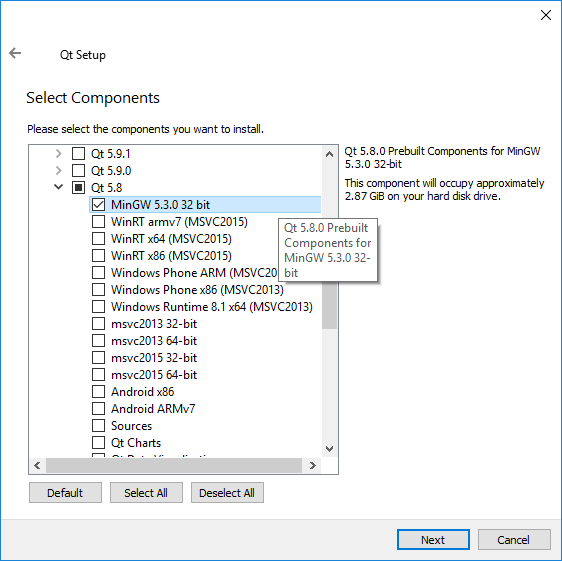
I installed Qt from https://www.qt.io, choosing the open source option. All the code in SpineCreator and friends is compatible with the requirements for using Qt under the free LGPL licence. In the Qt installer, I scrolled to Qt 5.8 and selected only the “MinGW 32 bit” checkbox:
Install graphviz
Go to http://graphviz.org/ and find “Download”. Download and install “Stable 2.38 Windows Install packages”. Do the usual Windows install process with this.
Install python
Go to http://python.org and Find Downloads -> Windows. Download Python 2.7.x in as a Windows x86 MSI installer. Don’t choose the 64 bit version! We need the 32 bit python libraries, as this will match the 32 bit build of SpineCreator that we’re going to make.
Building the SpineML toolchain on Windows
I’m going to make use of the bash shell, which should now be installed. To open a bash shell, you can open a command line terminal and type bash.
Compile BRAHMS on Windows
Clone the official version of BRAHMS (which sports a nice cmake compile and install scheme and supercedes any code available on sourceforce):
Open a bash shell
In the bash shell you have a Unixey home directory, but also a Windows home. I’m going to assume that you’ll do your work in your Windows home. In the bash shell this will have the path
/mnt/c/Users/[your name]/
mkdir /mnt/c/Users/[your name]/scsrc
git clone https://github.com/BRAHMS-SystemML/brahms.git
Build brahms with cmake:
cd brahms
mkdir build
cd build
cmake -DSTANDALONE_INSTALL=OFF -DCOMPILE_WITH_X11=OFF -DCMAKE_INSTALL_PREFIX=/usr/local ..
make -j4
sudo make install
Compile SpineML_PreFlight on Windows
Clone a copy of SpineML_PreFlight:
cd /mnt/c/Users/[your name]/scsrc
git clone https://github.com/SpineML/SpineML_PreFlight.git
Build and install SpineML_PreFlight using cmake:
mkdir SpineML_PreFlight-build && cd SpineML_PreFlight-build
cmake -DCMAKE_INSTALL_PREFIX=/usr/local ../SpineML_PreFlight
make -j4
sudo make install
Clone SpineML_2_BRAHMS on Windows
Clone a copy of SpineML_2_BRAHMS into your home directory:
cd /mnt/c/Users/[your name]/
git clone https://github.com/SpineML/SpineML_2_BRAHMS.git
There is no need to build SpineML_2_BRAHMS, which is a set of scripts.
Build SpineCreator on Windows
Clone SpineCreator:
cd /mnt/c/Users/[your name]/scsrc
git clone https://github.com/SpineML/SpineCreator.git
Open QtCreator from the Windows start menu. Now open the SpineCreator project. The file to open is called spinecreator.pro (note that some images are from the Linux version of QtCreator, and so may be slightly different to what you’ll see):

On opening spinecreator.pro, you’ll be asked to “configure” the project. You should be able to simply press the “Configure Project” button:

Compiling should now be as simple as pressing the “run” or “build” button in QtCreator:

Finishing up: Configuring SpineCreator on Windows
There’s just one last job to do. We have to tell SpineCreator where to find SpineML_2_BRAHMS, which we compiled and installed inside the Ubuntu bash environment.
Launch SpineCreator from the Qt Creator window, by pressing the “run” button, then, in SpineCreator, go to the menu “Edit -> Settings”. This brings up a window with three tabs. Choose “Simulators”.
Change the value for “Convert script” to “/home/[you]/SpineML_2_BRAHMS/convert_script_s2b”. Replace [you] with your username, so that the path points to the SpineML_2_BRAHMS which you cloned in your home directory.
Change the value for “Working directory” to “/home/[you]/SpineML_2_BRAHMS”
I set the settings like this for my home directory (/home/seb):

Click “Apply” then “Close”.
Your compiled version of SpineCreator can now find SpineML_2_BRAHMS. SpineML_2_BRAHMS can find SpineML_PreFlight and BRAHMS, because these were installed system-wide into /usr/local/bin/spineml_preflight and /usr/local/bin/brahms.
You should now be able to test your installation by running the GPR Basal Ganglia model.
Clone the model like this (in the bash shell):
mkdir /some/path/to/models
cd models
git clone https://github.com/ABRG-Models/GPR-BasalGanglia.git
Now in SpineCreator, navigate to GPR-BasalGanglia/SpineML and open the project file GPR_BG.proj. If these instructions worked, you should be able to run one of the Experiments in that project.